Google

Tuesday, October 30, 2007

One-pot Briyani


I know I've blogged about Briyani before, but it never hurts to revisit an oldie-but-goodie. This isn't a cheaters, budget version, but something a little more authentic to the Dum Briyani, which means the meat and rice are cooked together in the same pot. Besides the usual range of spices, you'll also need a slice of papaya for the marinade. I read somewhere that the compounds in papaya serves as a natural meat tenderiser and so would be great for tough meats like mutton and beef as well. Notice there's no tumeric in this recipe too - the nice brown colour is caused by the brown onions.

Ingredients
4 large onions, thinly sliced
3 chicken drumsticks
1 cup of long-grained rice (basmati recommended)
1 slice of papaya, mashed
2 red chillis, chopped
1 stick of cinnamom
1 tsp cloves
1 tsp coriander
1 tsp cumin
1 tsp fennel

1. Marinade the chicken with the mixture of papaya and chilli for at least an hour
2. Brown the onions in a pot with a little salt, until soft. Remove most of the onions but reserve a layer to coat the bottom of the pot.
3. Pour a third of the uncooked rice over the onions, followed by the marinaded chicken, another layer of rice, and then alternate rice and onions.
4. Pour one and 3/4 cups of water, ensuring all the rice grains are submerged underwater.
5. Cover and cook in low heat for 20 min or until the rice is cooked. Serves 3.

Cost Per Serving: $2.30
Breakdown:
Chicken: $3 for three pieces
Spices: $0.50 (averaged)
Rice: $1 for a cup (basmati)
Papaya: $0.70
Onions: $1.50

AddThis Social Bookmark Button

Thursday, October 25, 2007

7 Money-saving Food Tips for the Student on a Budget

I remember when I was studying in Melbourne as a uni student, it was tough making ends meet. I had to live on less than $1,000 a month, 60% of which went towards paying rent and transport, which didn't leave me much to work with in terms of subsistence. Tied down with a limited budget, here are 7 things I learnt to help maximise my money for my daily food needs:


7 Money-saving Food Tips for the Student on a Budget
1. Shop at the Wet Market
As opposed to the supermarket. Foods are generally fresher and cheaper – isn’t that reason enough? Well, actually there’s more. You get the chance to bargain too, and if you’re good there are steals out there to be bought. Going near closing time is another way of getting really good deals on produce from sellers looking to make a quick sale before the day ends. I remember shopping at Victoria Market in Melbourne an hour before closing time to get really cheap deals. The downside, however, is that most of the choice picks are usually gone by then. But staples like onions and potatoes can go dirt-cheap by the bag, and that works too because you should be buying in bulk (see tip #3).

2. Buy House Brands
When you do go to the supermarket, think Home Brand, Fair Price, No Frills and the like. In-house brands are the cheaper "versions" of the store items available, which means they are lower quality, right? WRONG! Very often, in-house brands are products from leading brands, repackaged and repositioned for the budget buyer. Why would a reputable brand want to do that? Simple: to take away market share from their competitor! So give in-house brands a try. Sure, I've had not-so-great experiences with Home Brand chicken nuggets, but I've been really taken with Home Brand Coffee. Anybody in Australia want to buy me a tin? Seriously. My supply is running out.

3. Buy Bulk
Make use of economies of scale. A 12-pack of toilet paper is cheaper than a 6-pack per roll. So is a 1kg tin of coffee compared to a 300gm per gram. And a 10kg bag of rice compared to 2kg per kg. Sure, it seems like you're paying more now, but buying in bulk makes efficient use of your money.

4. Shop with a List
If you find that you’re walking through the entire store just to get that one item, it’s probably no accident – the modern supermarket is designed in a way to entice you to spend more time in the store, and hence increasing your chances to buy more. One way around this is to make sure you have a list when you do your shopping. When you have a list, you can always pause a minute before you head to the checkout and see what’s made it into your basket that wasn’t originally in your list. Chances are, you didn’t really need them anyway - which means they can be taken out.

5. A little spice goes a long way
Forget that pre-marinated steak or chicken mix. Spices and condiments are an inexpensive way to add a multitude of flavours to your food without having to resort to more expensive pre-flavoured or pre-marinated foods. You'll be amazed what a dash of cumin does to your lamb stew, or a sprig of rosemary to your chicken, and how much difference a little salt and pepper goes. You don't need an extensive spice rack, just always have a few of your favourite ones on hand to make otherwise-mundane dishes spectacular!

6. Stew!
This one’s applicable to you carnivores. When buying cuts of meat, keep in mind that the tougher meats are usually the cheaper cuts of meat. So, instead of getting that juicy piece of steak, get a piece of brisket for a third of the price and turn it into a nice stew. With a little time and a little spice (tip #5), a good pot of stew can keep you filled for two, maybe three meals for the price of a steak.

7. Think Modular
When building my menus for the week I tend to think in terms of three category: carbs (rice/noodles/bread/potatoes), meats (poultry/pork/beef/fish) and veggies. At any point of time, I try to maintain at least two items in each category at the kitchen. That way, when I go out to top up groceries, I just know that I’m short of, say, 1 meat and 2 veggies. Keeping your kitchen stocks organized is a good step in making sure you buy what you need more than what you fancy.

That’s my 7 tips for saving money when living on a student budget. Do you have any tips to share from your experience?

AddThis Social Bookmark Button

Thursday, October 18, 2007

Lemony Prawn Salad

Like the previous recipe, the Chinese Duck Salad, this salad recipe's preparation is more in the prawns rather than the salad. Just slap on the greens and you have a great no-frills shrimp salad recipe! The prawns are great on their own as tapas, too.


Lemony Prawns (salad, optional)
1 pound of prawns/shrimp, meat only
2 tsp freshly squeezed lemon juice
4 tsp olive oil
1 tsp freshly crushed black pepper

1. In a salted pot of boiling water, cook the prawns until pink - should take about a minute or two.
2. Marinade the cook prawns in lemon juice, oil and pepper. Place in a glass or non-reactive meal bowl and cover with cling wrap. Leave in fridge for at least two hours - overnight is better.
3. Dish out what you need, when you need it. Can last in the fridge for up to a week. Serves 2-4 portions.

Cost per serving: $2 (approx)
Cost breakdown:
SGD$2.00 - 1 pound shrimp (approx)
SGD$0.40 - 1 lemon
SGD$6.00 - Salad Mix

Tags:

AddThis Social Bookmark Button

Sunday, October 14, 2007

Badge, onnabudget

Like the new look?

I figured it was time for studentonnabudget to go through a design revamp. I've had less time to add recipes because of the full-time job and the other website, but I still do cook my own budget meals.

In any case, to celebrate the site's revamp, I've created an aptly-named "I'M ONNABUDGET" badge for your blog or website. Show the world you're a Student on a Budget!

Student on a Budget

You can copy the code here:

AddThis Social Bookmark Button

Thursday, October 11, 2007

Roti John


It's easy if you know how. Roti John is a colonial-era dish created by Malay/Indian food store owners catering to European tastes. Essentially, Roti John (so named because it was made using "European" bread, and all European white men inevitably were named "John") is a savoury French Toast. It's usually made using a baguette, but I find that sliced white bread also serves as well. You can make the meat mixture ahead of time and leave it in the fridge for up to a week; the egg can easily make 3-4 slices of roti john.

Roti John
The Dry Stuff:
1 pound of beef/mutton/chicken mince, browned with butter
1 small red onion, sliced
1 red chilli, sliced
1/2 tsp cumin
Dash of pepper

The Wet stuff:
1 egg


The Base:
Bread. A baguette sliced lengthwise, if you're a purist, otherwise, sliced white bread will work just as well.

1. Combine the dry stuff and scoop a tablespoon per serving onto a shallow dish. Cover the leftovers with cling wrap and leave in the fridge.
2. Mix beaten egg and dry stuff on a shallow dish. Place bread on top of mixture and press down to let bread absorb as much of the egg mixture as possible.
3. Head a flat pan with a little oil or butter. Place bread, wet side down for two minutes or until egg is cooked.
4. Repeat until you run out of egg mixture!

Tags:

AddThis Social Bookmark Button

Wednesday, September 26, 2007

Ratatouille - the recipe, not the movie!

Yes, it's a recipe for ratatouille (rat-at-too-ee), inspired from watching the movie. (You should go watch it, it's really good!) In the movie, ratatouille was described as provincial - peasant food - but being a gourmet restaurant it looked better in the cartoon than how it is usually presented:


Basically, a ratatouille is a toamato-based vegetable stew, which explains the provincial description as peasants couldn't usually afford meat. I also suspect that every French provincial household has their own version of ratatouille, so feel free to change the ingredients as you see fit! Except for the tomatoes. Gotta have tomatoes. And the bacon. The bacon was there for flavour. Now, this recipe can easily be a throw-everything-in-one-pot and boil kind of stew, but if you have a little extra time, you might want to roast some of the veggies first (like in this recipe) for a richer flavour.

Noel and May's Ratatouille
1 carrot }
1 eggplant } cut into 1-inch chunks
1 zucchini }
1 pound mushrooms }
1 onion, sliced
2 rashers of bacon, sliced
2 cans of fresh chopped tomatoes
1 tsp garlic
1 tsp sweet basil
1 tsp tarragon
1 tsp fennel seeds
1 tsp black pepper
2 tbsp sugar
A dutch oven/roasting pan
Oil

1. Preheat oven to 180 deg C.
2. On medium heat, brown bacon with a little oil until cooked crisp. Drain bacon and reserve for later.
3. Brown onions in remaining fat, making sure to scrape bottom of pan for bacon bits. Season with herbs and spices.
3. Turn off heat, add garlic, zucchini, carrots and eggplant and mix well to coat everything with fat
4. Put the whole pan, uncovered, into the middle rack of the oven and bake for 35 min.
5. Put in mushrooms and tomatoes, mixing in sugar as well.
6. Return to oven, covered, for 30 min.
7. Top with bacon and enjoy! Makes approx 4-6 servings.

Before you start roasting the zucchini and eggplant, you might want to take some of the bitterness off by putting both ingredients in a colander, mixing in 1 tsp of salt and letting rest after putting a plate on top of the mix to apply pressure. Leave bowl or container at the bottom of the colander to collect the drained bitter water.

Tags:

AddThis Social Bookmark Button

Tuesday, September 04, 2007

Chinese Duck Salad

Sometimes, I just get tired of cooking and so I assemble a salad instead. This Chinese duck salad is made with roast duck - although you can (and should, probably, since you'd be on a budget) use some leftover roast chicken instead. The secret is in the dressing though, which works well with both chicken and duck.


Chinese Duck (or Chicken) Salad

1 serve of salad greens
1 roast duck breast, sliced - chicken works fine too.

Dressing:
3-4 spring onions, white parts only
1 inch ginger
1 tbsp sesame oil
2 tbsp chinese rice wine
1/2 tsp sugar

1. Make the marinade by mincing the spring onions and ginger into a fine paste. Mix the sugar and liquids after and leave in fridge for at least an hour.
2. Assemble greens and duck in a bowl and mix well with 1/2 tbsp of dressing. Enjoy!

Tags:

AddThis Social Bookmark Button

Wednesday, August 08, 2007

Green Tea Muah Chee


recipe modified from here

Ingredients:
250g glutinous rice flour
350ml water
4 tbsp shallot oil

Green tea peanut mixture
Ingredients:
250g toasted peanuts, grounded into a fine powder (some bigger pieces are fine)
2 tsp green tea/ matcha powder
50g caster sugar
2 tb toasted white sesame seed

Method:
1. Prepare peanut mixture by combining all the ingredients. Set aside.
2. Mix glutinous rice flour, water and 2 tbsp of shallot oil together to form a smooth batter.
3. Grease a microwavable container with the remaining oil and pour batter into it.
4. Cover with lid and microwave on high for 2 minutes. Remove from microwave, stir the semi-cooked dough briskly in one direction. Return dough to microwave and High for 1 minute. Remove, stir and return to the microwave high for 30 seconds. Repeat this method twice or until it is cooked.
5.Using a pair of scissors, cut cooked dough into small pieces and toss it into the green tea peanut mixture.
6. Serve and sprinkle more peanut mixture as desired.

Tags:

AddThis Social Bookmark Button

Thursday, July 12, 2007

the fish dish that tastes like tom yum


awhile ago , i was having a guest over for dinner . at that time , i was informed that she only ate fish or chicken...not my specialties . anyway , i ended up steaming a fish with a bunch of ingredients . she commented that it tasted like light tom yum soup . there wasn't a proper list of ingredients when i first cooked it...it was a go-as-i-feel . and then she kept bugging me to make it again . as i recreated it , i realized surprisingly after some research , that the ingredients were similar to that in tom yum except i didn't add any tomatoes . i don't know how that came about , but hey...as long as it tastes good right ?

what you need leh ? (i cooked for four)

2 flake fillets (chopped into a total of six shorter pieces to fit in the pot)
2 cups chicken stock
2 small red chillies , chopped (bird's eye a.k.a. cili padi)
1 tablespoon tamarind paste
1 tablespoon oyster sauce
1 tablespoon light soy sauce
2 tablespoons fish sauce
juice of 1 lime
5 kaffir lime leaves
1 stalk lemongrass , chopped
2 tablespoons brown sugar
handful of chopped coriander
ginger , sliced (about the size of a thumb)
3 pinches of ground black pepper

how to do leh ?

there's only one step to this one...simply mix everything into the pot and cook over low heat until the fish is done (which shouldn't take too long or your coriander turns into a color that just ruins your appetite)...or you can just fit everything in a bowl and steam it .


Tags:

AddThis Social Bookmark Button

Thursday, July 05, 2007

my salmon spectacular (ok...it's not that spectacular)


i first cooked this years ago . for some reason , i never bothered to write down the list of ingredients or take a photo of it every time i made it . this time , i made it a point to do both . i admit it's far from a budget recipe , but hey...salmon has the highest content of omega 3 amongst the fishes...and students need brains right ? (not that i'm saying you guys don't have any)

what you need leh ? (for 3 people)

3 salmon fillets

350 ml mayonnaise
240 ml dijon mustard
juice of 1 lemon
1 cup white wine (i only use brown brother's moscato)
a bunch of fresh dil
a bunch of fresh lemon thyme
1 brown onion , sliced (i usually turn them into onion rings)
handful of chopped coriander

240 g of shrimp

how to do leh ?

1 . set the salmon fillets aside for now
2 . combine the other ingredients , except the shrimp , into a bowl to make a marinade .
3 . coat the salmon fillets with the marinade and set aside for a couple of hours
4 . preheat the oven to 220 degrees celsius
5 . chuck the marinated fillets into the oven . i believe the rule is 5 minutes per inch...but 15-20 minutes is a safe bet .
6 . whilst waiting , cook shrimps in the leftover of the marinade for additional sauce . do note that 240 g of shrimp is too very generous .


Tags:

AddThis Social Bookmark Button

Wednesday, July 04, 2007

Otah


ingredients:
500g white fish
1/2 cup coconut cream
2 whole nutmegs
1 small piece balanchan
1 tbs chilli powder
1 inch piece of ginger (around the size of a thumb), minced
1 inch piece of galangal (blue ginger), minced
1/2 cup of shallots
1 tbs rice flour
1 tbs oil
1 egg
1 tbs sugar

method:
preheat oven to 200 C.
Blend all the ingredients in a food processor.
Grease a baking tray and spread otah mixture on it.
Bake for 20-30 minutes.

Tags:

AddThis Social Bookmark Button

Friday, June 22, 2007

Tagliatelle in Saffron and Mascarpone Sauce with Prawns


Ingredients for 6:

600g Tagliatelle
2 onions
1 Garlic clove
2 tb Olive oil
1 pinch Saffron strands
200ml dry white wine
500g Mascarpone cheese (can be substituted with cream cheese)
36 small/medium prawns, around 300g
Salt and pepper
1tbsp fish sauce (optional)
1 tbsp light soy sauce (optional)
1 tsp dried dill
1 handful torn fresh basil leaves to garnish


Method:
1. Cook the pasta according to package instructions.

2. Finely chop the onions and garlic. In a large frying pan heat the oil, add the onions and garlic and fry for 2-3 minutes.

3. Add the saffron, then half of the wine and finally add the Mascarpone cheese. Simmer gently for a few minutes, add the remaining wine, prawns and dill. Season to taste with salt and pepper and add fish sauce and light soy sauce if you like.

4. Drain pasta, add sauce and garnish with basil leaves.

recipe modified from here

Tags:

AddThis Social Bookmark Button

Tuesday, June 19, 2007

Singapore Noodles

When I was studying in Melbourne, I was always amused by the existence of the "exotic" "Asian" dish called "Singapore Noodles". Anyone from Singapore would tell you - there's no such thing. Although, there is something called Hokkien Mee which is made in Singapore, and very much unlike the 'usual' Hokkien Mee made with dark sauce, and that's another story altogether. I've come to realise though, that the so-called "Singapore Noodles" is modelled after Punggol Mee Goreng.

Punggol (now known as Sengkang) is an area in northeast Singapore near the sea shore that was known for its fresh seafood. Mee Goreng, of course, means the fried noodles of the mamak variety. Thus, Punggol Mee Goreng, or "Singapore Noodles" is something akin to Indian-style fried noodles with seafood.

Talk about mixed up! So I present to you my humble attempt at Singapore Noodles, or Punggol Mee Goreng:


What you need:
1 packet of yellow Hokkien noodles (should be 1 kg, and make sure you loosen them first)
3 eggs
3 tbsp oil
1/2 cup fish stock

(the following ingredients to your discretion)
2 fish cakes, sliced
6 tofu puffs, each cut in two
12 prawns, shelled and cooked
12 squid rings, cooked
1 tomato, chopped
2 spring onions, chopped in 1-inch pieces

(mix into a paste)
4 tbsp tomato ketchup
1 tbsp oyster sauce
2 tsp sugar
2 tsp sesame oil
Optional: 1 tsp chilli powder


1. In a large wok, heat oil and fry eggs until lightly scrambled.
2. Add noodles and mix well with egg. Pour in fish stock and let noodles absorb the flavour.
3. Mix the sauce paste into the noodles, stir well
4. Finally, mix in the seafood, beancurd puffs and veges. Serves 5.

Tags:

AddThis Social Bookmark Button

Tuesday, June 05, 2007

The Chicken that exploded my nose

I've been experimenting with wasabi powder of late, especially since I discovered wasabi peanuts as a snack. So for may packed lunch this week I decided to experiment a little bit more with all the hot stuff in the kitchen to create the Chicken That Exploded My Nose.


The Chicken That Exploded My Nose
Ingredients
Chicken breasts, cut in strips
2 tbsp Dijon mustard
1 tsp wasabi powder
1 tsp chilli powder
Breadcrumbs

1. Create a marinade using the mustard, wasabi and chilli powder to marinade the chicken with. Leave in fridge for a couple of hours.
2. Coat strips with breadcrumbs and deep fry until golden brown.
3. ALTERNATIVELY, coat breadcrumbs, spray with oil and bake for 20 min.

The picture you see is the fried version. Unfortunately, it didn't explode my nose as expected and was VERY much less spicier than I intended it to be. So I decided to make a dipping sauce to go with it.

The Dipping Sauce for the Chicken That Exploded My Nose
2 tbsp dijon mustard
2 tsp honey
1 tsp wasabi powder

1. Mix everything together. Use as condiment for the chicken and poultry.

Tags:

AddThis Social Bookmark Button

Sunday, June 03, 2007

cheese and chive muffins


ingredients:
1 egg
¾ cup water
1 cup self-raising flour
½ tsp salt
125g grated cheddar
1 tbsp fresh chives
½ tsp pepper
coarse sea salt (optional)

method:
mix all ingredients until just combined.
Spoon into well-greased muffin pans and sprinkle with sea salt.
Bake at 190 degrees F for 15 minutes.


comments: from my beloved penguin muffin bible. A very simple recipe!! No oil/ butter added...very crispy on the outside...and the taste is reminiscent of deep-fried fritters.. makes a great little party snack!! possible variations: corn kernels/ minced onions/ sun-dried tomatoes..

Tags:

AddThis Social Bookmark Button

Wednesday, May 30, 2007

Refreshing Tuna

Why do I call this the Refreshing Tuna? Because unlike normal tuna sandwich fillings, this one doesn't use any mayo or creamy base but a citrus juice instead. It's a super easy recipe, and the result is a light sandwich filling that brings out the natural flavour of the fish. It also has the added advantage of being low-fat. =D


Refreshing Tuna (sandwich filling)
1 can of tuna in mineral water
1 tsp fresh crushed black pepper
Juice of half a lime
Dash of tabasco sauce (optional)

Mix all the ingredients in a bowl and fluff with a fork. (See? I told you it was super easy.)

Tags:

AddThis Social Bookmark Button

Wednesday, May 23, 2007

Chicken Tikka


This is my version of the Indian tandoori dish, from scratch. Obviously, I don't have a large clay oven hanging at home, so one uses the conventional oven to bake and then broil this dish. Also, I used breast meat which is dryer, but makes it easier to cut into huge chunks. My favourite tandoor usually uses rolled up chicken thighs that are more juicier.

Noel's Chicken Tikka

Marinade:
1 small package of yoghurt
1 tsp cumin, ground
1 tsp coriander, ground
3 tsp tumeric, ground
5 tsp chilli powder (or to your taste)
1 tsp black pepper, ground
1 tbsp sugar
juice of one lemon
1 one-inch piece of ginger, grated with juices

Chicken pieces, cut in 2" chunks
Aluminum Foil

1. Mix all the ingredients of the marinade together, reserve 1/3 for later. Marinade chicken in remaining 2/3 portion, in the fridge for at least 2 hours.
2. Preheat oven to 180 degrees. Make a foil pouch and bake tikka in oven for 15 min.
3. Set oven to grill at 200 degrees. Remove pouch cover (we're going to put it back to the oven). Dip baked chicken in reserved marinade and grill on each side for 5 min. Serve with rice and curry! =D

Tags:

AddThis Social Bookmark Button

Tuesday, May 22, 2007

essential condiments

In my first year, I wanted to know what condiments to buy..but wasn't really sure...

after 2.5 years of trial and error...here are my essentials...


For Asian cooking:
sunflower oil
light soy sauce
dark soy sauce
oyster sauce
sesame oil
white pepper
rice wine (hua diao/ shao xing)
fish sauce
corn starch
thai sweet chilli sauce
dried shitake mushroom (can be used in so many dishes....and the soaking water can be used as stock too..)
sesame seeds
rice flour

nice to have:
dark vinegar
dried chillies


'Western' cuisine: (means most of the recipes i get from Aussie magazines/ All Recipes which is US based)

olive oil (extra virgin for drizzling over salads, 'regular' for cooking)
black pepper
white wine
chicken salt
cumin powder
parprika powder
chilli powder
dried mixed herbs
dried parsley (good as garnish on most everything and helps with garlic breath too!)

nice to have:
dried dill (great with tuna and salmon dishes)
sliced black olives
capers
anchovies
sun-dried tomatoes

my messy side cupboard..herbs and spices on the top 2 racks..flours and nuts on the bottom.


for desserts and baking: (my regular stash)
Sugar: brown, white, icing + rock sugar
flour: regular + self-raising
vanilla essence (i use the imitation type; find the flavour good enough...)
baking powder
baking soda
gelatine
cocoa powder
butter
raisins
peanuts
dessicated coconut
honey
cinnamon powder
dried black dates


stuff that feature regularly in the fridge/ freezer/ pantry:
coriander greens
greek style yogurt
chicken thigh fillets
pandan leaves
frozen spinach
crumbed fish (great as backups when unexpected guests arrive, just bake and drizzle thai chilli sauce on top)
bean sprouts (just learnt that they can be FROZEN! I have been wanting to cook lasksa for the longest time...that's why they r in the freezer..)
puff pastry
mixed frozen vegetables
crabsticks! (chawan mushi, stir frys, noodles, all-rounder filler)
dried pasta
rice (Jasmine/ long grain best for chinese/ thai/ indian cooking, short grain good for korean/jap/rissotos)
ginger
garlic
eggs

canned goods:
tuna
salmon
corn
water chestnuts
mixed fruits
coconut cream (Please note distinction between coconut cream and coconut milk. 'Cream' is from the first pressing and much richer, ie: higher in fat!!! Most recipes call for coconut milk. To make coconut milk from coconut cream, just add water to 3 tbsp of coconut cream to make up a cup. Coconut cream, unlike dairy cream, can be stored in the freezer.)

my new dried chinese foodstuffs collection for chinese desserts and soups:
nan xing/bei xing (sweet n bitter almonds)
dried red dates
huai shan
wolf berries
mandarin peel (home-made, just leave 'regular' mandarin peel out til they are dry and crispy.)
green beans
red beans
dried logan
sago
rock sugar

These are just essentials??? Seems like alot of ingredients right....hmmm.....

So what are your cooking essentials??? :)

Tags:

AddThis Social Bookmark Button

Sunday, May 20, 2007

Kimchi Fried Rice

Kimchi is a pickled vegetable salad unique to and ubiquitous in Korea. The stuff is obviously salty, and generally spicy and usually served cold. A bottle of kimchi can be a little pricey, but it goes a long way because it can last a while in the fridge. It makes a great addition to the fridge as instant food, because it can be eaten with just about anything. Late night snack? Enliven your instant noodles with a side of kimchi! =D

I was walking through a food court yesterday when I saw a menu offering kimchi fried rice. Having some kimchi stored in my fridge, here's my version of the dish. You can use any meat you like, although I imagine the white meats go better with this dish than the red ones. And char siew (Chinese barbecued roast pork) might also not go well with the dish as the sweetness of the char siew will interfere with the kimchi.


Noel's Kimchi Fried Rice
(serves 2-3)

2 cups of cooked rice
2 eggs, lightly beaten
1 tomato, chopped
1 spring onion, chopped
Cooked meat: for this dish I had sliced chicken breast and roast pork.
2 servings of kimchi - bear in mind that it should be 1/3 a regular serve of vegetables because of the salt.
1 tbsp of kimchi "juice" (the liquid that is left from the kimchi)

1. Fry egg on wok. Bunch on side of wok while adding rice to heat.
2. Mix cooked scrambled egg with heated rice, add spring onions and tomatoes, followed by meat.
3. Turn off heat. Add kimchi and kimchi juice last, stir in warm wok (without the fire on). Serve.

Tags:

AddThis Social Bookmark Button

Wednesday, May 09, 2007

Spicy braised eggplant


recipe inspired from Umami's dish of the same name

ingredients:
1 onion, VERY thinly sliced
5 dried chillies (can add more or less according to personal perference)
500-600g eggplant, sliced into 2 inch strips
200g chicken mince (can use any other type of meat as well)
tbsp oyster sauce
1 tbsp dark soy sauce
1 tbsp light soy sauce
1 tbsp sugar (can adjust according to taste)
2 tbsp dark vinegar

2 tbsp corn starch w/ 4 tbs water

meat marinate: dash of sesame oil, white pepper, dash of light soy sauce, 1 tbsp corn starch

method:
1. Marinate meat and leave for 20 minutes.
2. Add oil into pan. Wait til it's hot. Add onions. Fry til light brown.
3. Add chillies and fry til they are BLACK. There will be choking smoke, this is normal.
4. Add meat and stir fry for a while. Add eggplant and the rest of the seasoning.
5. Add 250ml of water and bring to boil.
6. Simmer for 20 minutes and add the corn starch mixture. Stir and adjust seasoning if necessary.

Serve with white rice and a sprinkling of scallions.

comments: This is really comforting and goes so well with rice...MmmmmMmmm...try it!! You'll be surprised how good it is!!!

Tags:

AddThis Social Bookmark Button

Tuesday, May 08, 2007

Noel's Spiced Embutido

An embutido is, strictly speaking, a sausage (complete in its intestine-encased glory) - but in the Philippines it's become more like a steamed meatloaf. I adapted this recipe from a Filipino cookbook lying around the house. It's a little more spicier, but on hindsight it could also have been a little more sweeter by adding sultanas in the mix.


Noel's Spiced Embutido


1 cup of croutons
500g minced pork
2 hard boiled eggs
Milk
Pepper
Chili powder


1. Run the croutons through a blender until fine (breadcrumb) consistency. Pour enough milk to just cover the crouton-crumbs.

2. Mix pork, crumbs and spices together well. Split into two portions.

3. Spread each portion on a piece of aluminum foil. Lay sliced hard-boiled egg on each portion, the roll foil to form a meatloaf cylinder.

4. Steam for 20 min. Served warm or cold. =D

Tags:

AddThis Social Bookmark Button

Quick Rosti

Ah, the ubiquitous potato. What's one to do when one needs the carbs but is bored with rice? The trusty potato comes to the rescue. I was wondering what kind of carb to pack for my lunch meals this week, and instead of going for the mash, I decided to whip up a quick* rosti instead.

* err, that's quick if you have a large grater. And I only spent 20 min preparing the whole dish, so that's pretty quick - I have a policy of not spending more than half an hour preparing my pack meals every night.

Quick Rosti

2 large potatoes, grated in long strips
1/2 inch knob of butter
1 tbsp plain flour
Pepper
1/2 tsp Tumeric
1/2 tsp chili powder

1. In a shallow pan, melt butter and reserve half for later.
2. Mixed grated potatoes with flour and spices.
3. Heat pan with melted butter on medium-low heat. When the butter bubbles, lay potato mixture on pan, spread and flatten.
4. After two or three minutes, use a metal spatula to scrape the bottom of the potato pancake to separate it from the pan. Fry until crispy. (Or smells a little burnt. heh.)
5. Pour the remaining butter on the uncooked side of the rosti. Flip over and fry until crispy.


Note: Two large potatoes for me work nicely with my 12" pan. You might want to experiment the amount of potatoes with your pan. Also, tumeric isn't part of the traditional rosti recipe, but I added it in the keep the pancake a nice yellow colour.

Tags:

AddThis Social Bookmark Button

Wednesday, May 02, 2007

Sweet & Spicy Meat Balls


This is my housemate, Kevin's recipe. I usually never like meatballs but these are the only ones I'll touch.

Sweet & Spicy Meat Balls

500g beef sausage mince
Sultanas
Fresh Parsley
Chilli flakes

1. Empty the beef sausage mince in a large bowl.

2. Throw in a generous handful of sultanas, some fresh parsley and chilli flakes into the beef sausage mince (there are no exact measurements for this recipe: If you like sultanas, be generous; if you love chilli, go wild. Just estimate.).

3. This is the fun part: Start mixing everything up with your hands. Hands are the way to go. It's the best way to make sure everything's mixed in.

4. Create some rough-looking balls (no need for perfect rounds). Not too big, about half the size of a tablespoon. 500g of beef sausage mince should give you about 20 balls.

5. Heat a generous amount of oil in a frying pan.

6. Fry up meatballs until the inside is cooked. Set aside on paper towels.

7. Voila!

This is a perfect snack because you can keep it for a few days and you don't need to heat it up before eating.

Big yum. Seriously addictive.

* Courtesy from Kevin *


Tags:

AddThis Social Bookmark Button

Spiced Indian Rice with Curry Chicken


Yes, yes...It's been a long time. So long that I actually forgot my username and password!

But it's back to business from now on. I've definitely expanded my menu now that I've become an actual uni student again.

Before I start, I apologise beforehand for all the photos that I'll post here. I think I'm the only person who still believes in film cameras and the only modern camera I have is my crappy 1.3 megapixels phone camera.

But who cares about pictures? We need to eat!

* note: I haven't put in exact measurements for how much rice or chicken to use. It really depends on how many people you're serving. Just adjust accordingly. *

Spiced Indian Rice

Basmati rice
1 red onion (huge if possible) - diced
A tiny bit of minced ginger
1 carrot - grated
Butter
1 cinnamon stick
3-4 cloves
1 teaspoon tumeric powder (a.k.a kunyit)
Sultanas

1. Wash the Basmati rice and drain off the water. Set aside.

2. Heat about 1-2 tablespoons of butter in a wok/frying pan, throw in the cinnamon, cloves and onion. Fry until onions are soft and fragrant but not brown.

3. Pour in the rice and carrot. Stir fry for a bit. Then add in the tumeric powder and mix well. The rice will turn yellow. Add a bit of salt.

4. Transfer the rice into a rice cooker. Flatten the rice so it sits in nicely then pour in some water. Just enough water so that there's a thin layer of water above the rice.

5. Leave the rice to cook. Once the rice is done, mix in sultanas.

6. Voila!

Curry Chicken

Chicken breast or drumstick (depends what you prefer)
1 red onion (huge if possible) - diced
1 cinnamon stick
3-4 cloves
A bit of curry leaves
1-2 teaspoons of tumeric powder (just enough to marinate chicken)
2 tablespoons dry curry powder
2 tomatoes - wedges
2 potatoes - wedges
1 zucchini - sliced
2 tablespoons santan powder mixed with water or coconut milk

1. Wash chicken, pat dry and rub chicken with tumeric powder and salt. Set aside.

2. Heat oil, throw in cinnamon stick, cloves and onions. Fry until onions are soft and fragrant but not brown.

3. Add in chicken and stir fry. Add curry powder and continue to stir fry. If chicken starts to stick to the wok, add in tomatoes or a bit of water. Throw in curry leaves.

4. Add in potatoes, zuchinni and some water. How much water depends on how much gravy you want.

5. Turn the heat down to medium and wait until the potatoes are cooked and soft.

6. When the chicken and potatoes are done, stir in santan. Add in more santan if you want your curry to be thicker.

7. Add salt to taste and serve with spiced rice.

8. Voila!

Tags:

AddThis Social Bookmark Button

Tuesday, April 24, 2007

Dim Sum Style Chee Chong Fun!


recipe from Imperial Kitchen Forum

Ingredients :
150g Rice Flour
1 ½ Tbsp Wheat starch flour
2 Tbsp Corn flour
1 Tbsp Oil
2 cups Water
½ tsp Salt

Method :
1. Sift the 3 types of flours together.
2. Slowly add the water, mixing as you add.
3. Add the oil and salt and mix thoroughly. Set batter aside for at least an hour.
4. Prepare your steamer. Grease a swiss roll pan or any aluminium tray with oil
and pour the batter directly on the pan and steam for 5 mins.
5. After steaming, using a plastic scrapper roll the ccf up. If you are using
ingredients like char siew or prawns, you can sprinkle it over the steamed ccf
and then proceed to roll it up.
6. Place in a plate brushed with a little oil. Continue with the rest of the
batter.


Sauce:
Ingredients
1 tbsp oil
2 tbsp sugar
a few slices of ginger
½ cup water
4 tbsp mushroom flavoured soy sauce or normal light soy sauce
½ to 1 tbsp dark soy sauce

method:

1. Place ginger with oil and sugar in a pot. Cook over small fire until sugar
turns brown.
2. When sugar is brown, add in the rest of the ingredients. Cook over medium
fire for about 5 mins. Taste the sauce and adjust taste accordingly. If you
find the sauce too sweet, you can add in a bit of salt.

Modifications: I added sliced chinese shitake mushrooms in the sauce too. (To prep: Soak in hot water with 1 tsp of sugar for 20 mins). For filling, we added crabsticks, the mushrooms, spring onions.

Comments: HEAVEN!!!! It's really the thin and soft type ccf...very yummy!!! Quite time consuming though....Qin and I took nearly 1 hour 15 mins to make 6 rolls....eat and make, eat and make...so by the end of it, we were both very full cos the meal took so long!!! hahaa...

Tags:

AddThis Social Bookmark Button

Sunday, April 01, 2007

Spiced Steak


Wet-market butchers aren't all that known for custom cuts of meat - in my wet market, most of the butchers either sell pork or chicken. Only one stall sells the red meat, mutton and beef, so there wasn't a high chance of getting the "western" style cuts of meat like ribeye or tenderloin. But, I felt like a steak for lunch. So I went up to the Indian butcher and told him:

"I feel like a steak for lunch!"

He reached in his chilled meat compartment and took out a hunk of sirloin. "How thick do you want it?" I got a 3/4 inch piece of sirloin steak for $3. Seeing how I don't usually eat steak at home, I felt inspired to dress it up a little:

Noel's Spiced Steak

1 tsp cumin
1 tsp coriander
1 tsp chilli powder
2 tbsp olive oil
A nice piece of steak

1. If you have the time (like I did), use whole cumin and coriander seeds, toast them lightly on a pan before grinding them into powder.
2. Form a paste using the cumin, coriander, chili powder and oil.
3. Marinade the steak, rubbing the spice paste of both sides of the steak before leaving in the fridge to marinate for at least an hour (I gave it two)
4. How to cook a perfect steak: On a medium heat, heat a little oil on a grill pan. Once hot, place steak on pan AND LEAVE ALONE FOR 4 min. Then flip over, for another four minutes. That's right. JUST FLIP ONCE. After that, move to a plate and cover with a pan cover, or something. For another FIVE minutes.
5. Serve with nasi padang, like I did. =D

Tags:

AddThis Social Bookmark Button

Tuesday, March 06, 2007

Chap Goh Meh away from home..

The Chinese New Year celebration commonly goes on for 15 whole days. The 15th day is known as "Chap Goh Meh" which means in English: The 15th day of the first month.

I had to return to Sydney as classes began half way through the new year celebration. A bunch of us homesick Malaysians decided to have a pot-luck "chap goh meh" get-together for lunch last Sunday. Owen was real nice to volunteer his living room for the day. It was a small group of about 15...but it felt nice to be around friends.Prior to Sunday; I heard that there would be lots of "chicken" that afternoon. I decided fried prawns and a beef dish would be a safe idea. Pinky made her famous fish curry too!
Cooking wasn't too much of a hassle, although I must admit; it was my first go at making stir-fried beef with black bean sauce.
Our Chinese New Year buffet spread turned out a little more 'culturally diversed' than what we had expected! *laughs* We had a range of Japanese, Korean, Western, Indian, Malay cuisine on the table. Apparently; I was the only person cooking anything 'fairly' Chinese! *sigh*I guessed it didn't matter...we had more than just Chinese people with us to celebrate and the food turned out real good~
Here's the recipe for the prawns if anyone's interested.


Frozen/fresh prawns shelled (tail left on)
Marinade: chili flakes, lemon juice, chopped coriander leaves, salt to taste
Fresh egg noodles (available at asian grocery stores)


Marinade prawns for at least 20-30 minutes. Gently shake and pat dry gently before wrapping in strands of egg noodles.
Deep fry in hot canola/peanut oil in small batches. Scoop out when prawn tails turn pink and noodle is crisp and golden. Drain excess oil on a kitchen towelette and serve immediately with sweet chili dressing.

Try serving them right away. I had a couple piping hot and crisp before we made our way to Owen's place; and they were YUM!!! After having been left exposed for more than 30 minutes; the noodles turned a tiny bit soft, but they still turned out tasting alright I guess.

On the 15th day of the lunar calendar; the moon is said to be at its fullest.
A couple of lunatics took a walk to the beach to check it out. *grin* Being in the cold that night was probably what made me sick. *SnEEzE!!* *sniffle sniffle* *Sigh*

Tags:

AddThis Social Bookmark Button

Saturday, February 03, 2007

Japanese Chilled Udon

Hello everyone from the long breakkkk...

In the event of a 30-degree-day in Melbourne, I made myself a delicious Japanese-style dish which is super easy and cheap to make. (You can find more background story of why-so here.)

Serves one!

Ingredients:

  1. 1 Pack of Udon
  2. 1/2 cup of diluted Tempura sauce/Japanese chilled noodle sauce (Can be purchased at Asian Groceries, please dilute as instructed on the package. Tip: if what you are using is tempura sauce, add a little bit more water then instructed - e.g. if it is the ratio is 1:3, try 1:3.5 or 1:4 instead.)
  3. Nori, thinly chopped (optional)
  4. Wasabi (optional)
Steps:
  1. Cook the Udon in water - as instructed in the package, but you can leave out all the seasonings if it is advised on the package.
  2. While you are waiting for the udon to be cooked, dilute the tempura/chilled noodle sauce as instructed and then pop it into the freezer for cooling.
  3. Drain the udon's cooking water, splash and soak it with cold water until it's cold like water temperature.
  4. Put the udon into the freezer for several minute to speed up the cooling process.
  5. Five minutes later, serve the udon and sauce in separated bowl/dish.
  6. Dip the udon into the sauce when eating it.
Ta-da!

Tags:

AddThis Social Bookmark Button

Thursday, February 01, 2007

Black olives fried rice & Baked basil eggplant in less than 30 mins

**Ready to eat in less than 30 mins!**
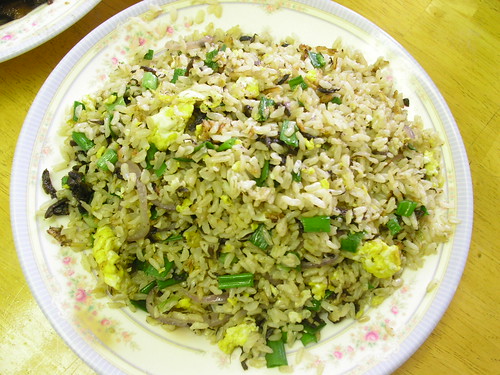
Black olives fried brown rice
PICT3273
ingredients:
2 T black olives paste (bought from oriental market...usually eaten in plain jook as its salty)
OR 15 black olives (chop it and seasonings will need to be increased)
3 cloves garlic
3 cups cooked long grain brown rice*
2 eggs
1/2 large red onion
3 stems green onions, chopped.
seasonings: pepper, soy sauce, mushroom seasoning, salt
Directions:
1. Peel onions and garlic and fry in an oiled pan. Add cooked rice.* Remove from pan.
2. Beat egg and add pepper, soy sauce and mushroom seasoning.
3. When the egg is almost cooked, stir in the cooked rice. Add in preserved olives and mix well!
*Note: **If over night rice is too dry, add water while cooking.
**Overnight rice cooks better
**I allowed the rice to be a little "burnt" on the pan; just like bibimbup on stonebowl
~~~::~~:::~~~::~~~
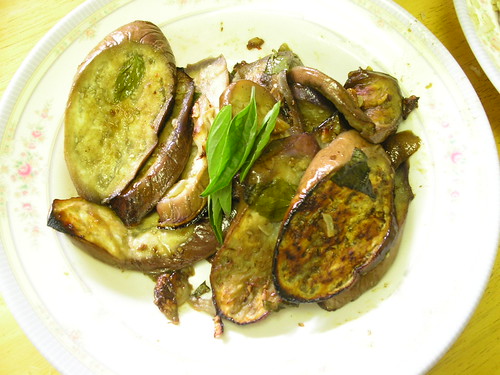
Baked basil eggplant.
PICT3272
Ingredients:
2 large eggplant, bunch of FRESH basil leaves, 4 cloves chopped garlic, 2T sesame oil, 5T vegetable oil, 2t soy sauce, 3t onion powder, 2 T spicy eggplant seasoning, pepper, salt, sugar.
Directions:
1. Slice eggplant 1/4" thick. Place it into a bowl and add in all the ingredients above. Place it on a tray and bake at 500F for 20 minutes to get ~~ fragrant and tasty eggplant! *_*
~~~::~~~:::~~::~~~
Note: the seasoning noted here is the approximate amount used. Be adventurous and substituted with what you have and like when cooking!
*that's why i love chinese cooking...feel so free~ & easy~!*


Tags:

AddThis Social Bookmark Button

Thursday, January 11, 2007

Green Pasta

The first recipe post for the year! I was in a pasta-ish sort in preparing my packed lunches for the week, but I wasn't sure whether I wanted a tomato-based sauce or a cream one. In the end, I settle for neither and opted for a green-vegetable based sauce. The result is almost like a pesto, although I took inspiration from a green pea soup as the sauce base.

(there would've been a picture here. but i forgot to take it. d'oh! -_-)

Green Pasta Sauce
1 cup of frozen green peas
2 cups of fresh spinach leaves
1 medium onion
1 tbsp garlic
1 bunch of mint leaves
Salt
Pepper
Olive oil to flavour
Leftover Christmas meat (I used a combination of cooked chicken and ham, chopped)

1. Boil the peas in salted water. Once cooked, drain and reserve cooking liquid
2. Blend peas, spinach, onions, garlic and mint in three equal parts; for two parts, use the reserved cooking liquid to moisten the mix, for the last part, use olive oil
3. Combine the sauce together in a shallow pan and cook lightly over low heat, stirring continuously until fragrant.
4. Mix in meat and season to taste.
5. Spoon over cooked pasta for a satisfying lunch!

By itself, the sauce tastes like a blended salad (whici is what it is, essentially). Combined with pasta, the meat and mint make this a surprisingly refreshing - and nutritious - meal!

Tags:

AddThis Social Bookmark Button