Google

Monday, October 31, 2005

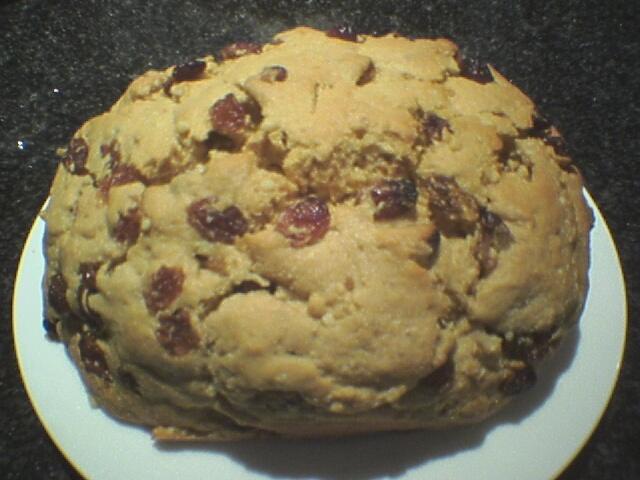
Lite & Easy Butter Cake


This must be the easiest and yummiest cake to bake and enjoy.

Tis' being the season of Divali and Hari Raya, I was reminded of the mountaineous amount of sweets and goodies on our friends' coffee table when we made our visiting rounds.

The butter cake was always a feature but it was always oily, heavy and after eating 3 or more slices, as the Malays would say, we would feel so jelat.

This recipe's different: It's light, non-greasy and a definite success for the jittery first-time bakers.

15 mintues preparation time
1 hour cooking time

The Baker's Tool Box:

Large and deep 20cm round cake pan
Electric mixer
Big mixing bowl (a must have!)
Skewer

The Baker's Pantry:

125g butter, softened
1 teaspoon vanilla extract
1 1/4 (275g) caster sugar
3 eggs
1 cup (150g) plain flour
1/2 cup (75g) self-raising flour
1/4 teaspoon bicarbonate of soda
1/2 cup (125ml) milk

Flour Up To My Elbows:

1. Preheat oven to moderately slow (140 to 160 degrees).

2. Grease the cake pan and line the base with baking paper.

3. Beat all the ingrediants in a large bowl on low speed with an electric mixer until just combined. Increase speed to medium and beat until mixture is smooth and changed to a paler colour.

4. Pour mixture into the prepared cake pan.

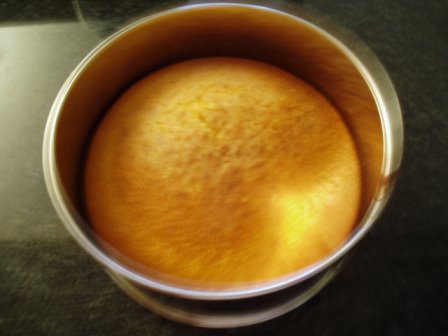
5. Bake for about an hour to an hour and 15 minutes; depending on your oven. Insert a skewer in the middle of the cake when you think the cake's done and only remove the cake from the oven when the skewer comes out clean.

6. Stand the cake in the pan for 5 minutes before turning onto a wire rack. Turn the cake top-side up to cool.

Baker's tips:

1. The secret to a wonderfully smooth and moist butter cake is the mixture itself. So make sure you take some time mixing it well and ensuring that the mixture is smooth and a golden yellow.

2. The cake can be done in less than an hour so make sure you keep a careful eye on your cake.

3. Use a large and deep baking pan to avoid getting an ugly looking cake with cracks in the middle.

4. Always use the skewer method!

5. If you would like your cake to have a slight caramel flavour, substitute the caster sugar for 295g of firmly packed brown sugar.

There: Easy, ain't it?

Enjoy munching!

Tags:

AddThis Social Bookmark Button

Wednesday, October 26, 2005

Macadamia Shortbread


"I'm not a cook...I'm not a cook...", chants Robin Williams in my favorite film of all times, Mrs Doubtfire as he/she places a perfectly cooked lobster on a platter.

In many ways, I relate to shim: I'm not a great cook but I've had some success in certain areas, particularly baking.

I know many kinda freak out at the idea of baking cos' you need the equiptment and tools, but if you're interested enough in baking but lack the tools, it's best to start with cookies cos' for most cookies, all you need is a spatula and a big bowl.

Macadamia shortbread.

Arnott's makes wonderful ones but are so expensive and stingy with the amount of biscuits in the box.

So why not make your own?

Contrary to popular belief, it's not expensive because you only need 75g of macadamias (which is really nothing).

(note: The picture above is not the macadamia cookies I made but it should look something like that)

Preparation time: 20 minutes
Cooking time: 20 minutes per tray

The Baker's Toolbox:

Baking tray
Large bowl
Electric mixer
Sift
Rolling pin (optional)
Baking paper
Cookie cutter

The Baker's Pantry:

250g butter (chopped)
1/2 cup (110g) caster sugar
2 teaspoons vanilla extract
2 cups (300g) plain flour
1/2 cup (75g) rice flour
1/2 cup (75g) finely chopped macadamias
2 tablespoons caster sugar (extras)

Flour Up To My Elbows:

1. Preheat oven to moderately slow (140 to 160 degrees; depending on how hot your oven gets).

2. Beat butter, sugar and extract in a big bowl with an electric mixer until pale and fluffy.

3. Sift flours and nuts in TWO batches, stirring ingrediants well with a spatula after each batch.

4. Press ingrediants together.

5. Turn onto a lightly floured surface and knead until smooth, taking care not to over-knead.

6. Divide mixture into 2 portions. Roll and flatten each portion between 2 sheets of baking paper, using a rolling pin if necessary.

7. Using a cookie cutter, cut through the mixture and place on lightly greased baking trays.

8. Mark biscuits with a fork and sprinkle with extra sugar.

9. Bake for approximately 15 to 20 minutes (again depending on your oven) until the cookies turn yellowish/straw coloured.

10. Stand on tray for 10 minutes before trasferring to a wire rack to cool.

Baker's tips:

1. If you find it difficult to roll out the mixture, refridgerate the dough for awhile before moulding and cutting. Make sure you don't leave it too long in the fridge; just firm enough to be rolled out smoothly.

2. Be creative! Use any sort of cookie cutters.

3. Store in an airtight container for up to 3 weeks. The shortbreads can be frozen up to 3 months.

Serve with tea and enjoy the afternoon!


Tags:

AddThis Social Bookmark Button

Me Steak and Sweet Potato Mash


Last part of my marathon...Hmm...craving for some juicy meat , i set out to buy some to make this dish...satisfaction of a growing boy's primal craving for steak is priceless...

What you need ar?
For the steak:
One piece of big juicy steak (i used a 350 g rump steak because its one of the cheapest you can get in any market)
Some butter
Some mixed crush peppercorns...which means black and white peppercorns lar (as always , Sarawak pepper is the best hor)
An oven
2 tablespoons of Horseradish cream(can get in almost any supermarket ya)
2 tablespoons of cream or 1/2 cup of milk (preferably extra creamy wan)
2 tablespoons of butter

For the sweet potato mash:
one sweet potato...i used a big 300 g wan
2 tablespoons butter
1 tablespoon cream or 1/4 cup milk
2 tablespoons sweetened condensed milk
A sprinkle of thyme

Now what?
Use your hands to massage the steak with butter until you happy with the coating...then rub the crushed mixed peppercorns however much you like (some people like more spicy wan mar) onto the steak...chuck in fridge to marinate for at least half an hour.Before cooking the steak , preheat the oven to about 180 degrees celcius (my oven lies about the temperature...so i think you people better use 210 degrees instead or you can just follow me if you want).Boil the sweet potato in water until soft soft.After your potato confirm soft soft , chuck the steak into the preheated oven for 4 to 5 minutes per side...or more if it doesn't look done to your liking.Whilst waiting , peel the boiled potato and mash it...then cook it on a pan with the 2 tbs butter , 1 tbs cream or 1/4 cup milk , 2 tbs sweetened condensed milk and thyme until everything is absorbed.By now your steak should be done...so dish it out onto a plate.To make the sauce for the steak , mix the horseradish cream , 2 tbs cream or 1/2 cup milk , 2 tbs butter and a sprinkle of mixed crushed peppercorns.Cook this for awhile on the pan and then pour over steak.Sauce for the sweet potato mash is just some more sweetened condensed milk to your liking.Decorate nice nice with some coriander and impress some girls if you want...

Warning ar : The sauce for the steak usually looks very slimy fatty at first but it will set wan so don't worry...and the sweet potato mash is not for the faint-hearted...it is a delicious acquired taste...so try only if you're willing to try something new hor...

Tags:

AddThis Social Bookmark Button

Me Mr.Smiley Mango Delight


Mango season's here...woohoo!!...One of my favourite fruits because you can hardly get durian here and the durian here sucks...

So here's my favourite simple dessert recipe of all time that some people are willing to kill me for...makes girls smile all the time when i make it for them...

How to make ar?

First , decide how much you want to make...Once you decide the amount , you mix half that amount of plain creamy yoghurt with another half that amount of pure cream...For you slow people , as an example hor , if you want to make 300 ml of this , you mix 150 ml of yoghurt with 150 ml of cream.How much mango leh?i think this wan best leave to you...my rule of thumb is usually 1 medim mango for every 150 ml of yeild which is actually quite a lot ya...Make sure your mango ripe and sweet wan so the expression of the people who taste it also sweet wan...Haven't finish yet...After mixing the yoghurt and cream , sprinkle brown sugar over the bowl of mixture and mix it in...then mix in some sweetened condensed milk (3 tbs for every 150 ml)...then mix in cubed mangoes...Finally , sprinkle one last sprinkle of brown sugar but don't mix and leave it overnight in the fridge to condition...When ready to eat , mix one last time and if you want to make a girl smile , arrange some mango cubes in the shape of a smiley face :)

Tags:

AddThis Social Bookmark Button

Tuesday, October 25, 2005

Fried Cooked Noodles


Part 2 of a marathon from me...heh heh

I grew up following mum's foochow traditions closely...especially in food...i really enjoyed this as a child...foochow fried cooked noodles...but this is not the original recipe...i created it with memory of its taste and perfected it somewhat over three tries...but don't sue me for any differences hor

What you need ar?
300 grams of noodles (preferably hokkien style...the big fat yellow ones)
reasonable amount of tofu (the fried bean curd puffs thing)
Reasonble amount of prawns peeled...i used 50 grams of large prawns...heh heh
2 tablespoon of olive oil
2 teaspoons of chopped garlic
2 eggs

80 grams of sliced beef or minced pork
1/2 teaspoon of corn flour
1/2 teaspoon of olive oil
2 teaspoons of ground white pepper (remember...Sarawak Pepper is the best lar...)
1/2 teaspoon of salt

2 tablespoons of oyster sauce
1 tablespoon of light soy sauce
3 cups of chicken stock /water mixture
White pepper to taste
a touch of sugar and a touch of chinese wine (optional)

Lets get cooking:

Quite complicated hor...so listen...firstly , fry the noodles in the 1 tablespoon of olive oil then set aside...Marinade the beef or minced pork (rolled into meatballs if use minced pork hor) with the cornflour , 1/2 teaspoon olive oil , pepper , salt and the eggwhite of one egg...wah...this marinade is shiok.To make the soup , mix the oyster sauce , light soy sauce and chicken stock / water mixture , pepper, sugar and chinese wine together in a big bowl.Then , after heating 1 tablespoon of olive oil in the wok , fry the chopped garlic until can smell the nice fragrance and it looks nice nice golden...then fried the marinated meat...making sure the egg white dun stick so much when fried...Then , add the soup.Bring to boil and simmer.Add in the prawns and tofu.Bring to boil and simmer for about 2 minutes...then drop in the fried noodles from earlier...and simmer another minute...then crack the last egg into the soup...if need...add thickening (1 tbs corn flour + 2 tbs water)...simmer for the final minute then...Fuah...now...dish the stuff in your wok into the big soup bowl you use just now.The original one actually only got roast pork (char siu) and some vege and no tofu...but i don't like vege and cannot find roast pork...some more i like tofu...so i make do lor hor...as long as taste good never mind lar hor?

Tags:

AddThis Social Bookmark Button

Humble Porridge


Towards the end of my period of no-moolahness , I had to settle for a bowl of humble porridge...didn't even have money to buy meat...so I cooked a bowl of something with what i had left around...so here we go:

What you need hor:
1 cup of rice (doesn't really matter what type of rice...its up to you how much you want to spend hor)
4 cups of chicken stock / water mixture
Some chopped cilantro a.k.a coriander
a touch of milk
Half an onion (chopped)
Some sliced ginger ( about 6 cm unchopped length)
2 tablespoons of oil (doesn't really matter what type...olive oil or vegetable oil preferred though)

and lots of sides...I was lucky enough to have a mum who smuggled pork floss for me to Melbourne...i hope no Customs officers are reading this...she packed some Malaysian style ikan bilis a.k.a anchovies too along with some acar (sourish thingies made with pickled vegetables seen as the greenish slimy stuff on the sort of upper left hand corner of the bowl of porridge in the picture...goes perfectly with keropok...which i don't have)

What you do leh?

Boil the chicken stock / coriander mixture , touch of milk and half the ginger (chooped) together in a pot because there's just a slightly reputable divine taste from this combination ya...Then after washing the rice till you happy with how clean it is , drop it all into the boiling mixture to let the rice expand and absorb the delicious broth by reducing the heat to a low one(don't use high heat lar...later the broth all evaporate too fast before can absorb)...Whilst waiting , fry the rest of the ginger in the oil in a saucepan to make ginger oil...after frying the ginger to a golden brown , remove the pieces and chuck them into the bin unless you can find something to do with it.Just as your stuff in the boiling pot begins to resemble porridge...which actually takes quite long so be patient , fry the chopped onions in the ginger oil . Then pour out the porridge into a bowl and top with the fried onions along with the other sides or serve these separately...of course...if u have meat...pop it in with the boiling mixture earlier in the form of meatballs...and there you have it...a humble bowl of porridge lar...enjoy hor but don't blame me if it doesn't reach your expectations...

Tags:

AddThis Social Bookmark Button

Monday, October 24, 2005

Eunice's apple and pork bake

Eunice is my housemate, and this is kinda her signature dish. So here she is in her own words... (okay lah, i just cut and paste her email)


ingredients:
porkchops
apples
onions
cinnamon sugar
salt
herbs
pepper and chilli powder if you want.
olive oil.

(don ask me about the proportaions..its guesstimation..)

fry onions in olive oil.. use quite a fair bit of olive oil.cos you need to
drench the pork chops and apple slices with it...
just add salt, cinnammon sugar.. pepper and all the powder stuff to the
chops..
and only cinnamon sugar on the apple slices.. make sure eveything is covered
with olive oil..if not it'll get burnt in the oven.. bake for about 35-45
mins depending on how many chops you have...min 35 for one.. so.. just put everything on a baking tray and bake it!!!

thats it...

AddThis Social Bookmark Button

Thursday, October 13, 2005

pork chops with chilli and orange glaze


Chilli? And orange? And pork? Sounds like a weird combo, but it works! Meats are all about the marinade, and here's one that works.

Pork chops
one and a half tbsp marmalade
one tsp light soy
two tbsp of olive oil
one or two red chillis, sliced thinly

Marinade the pork chops with the mixture and grill until the marinade becomes a nice glaze. best to get a little char, and to use chops with a fatty strip on the side. yummy...

Tags:

AddThis Social Bookmark Button

no sweat! chicken feet! ha! ha! all the way!

you either love them or you loathe them... me, i'm definitely in the love category.

This one is like the one you find travelling around in dimsum carts. Although, what i'd really like is the recipe for the one they have with chicken rice. you know? the translucent cold boneless one. but on to the recipe...

What you need:
Chicken feet, half kilo

(Marinade)
1 tbsp black bean sauce
1 tbsp minced garlic
1 chilli, finely sliced
1 tsp sesame oil
1 tsp oyster sauce

1. First, get chicken feet from the butcher. Big poultry stores should have it, and for cheap too... like will cost less than $2 for a kilo. Alternatively, get eight chickens and chop off their feet. hahahaha... Don't forget to chop off their claws. They don't call it chicken scratchings for nuthin.

2. Boil the feet in water until skin is soft... about 15 to 20 min maybe? Don't throw the water away! You can use them to steam the feet later, but better still, save it because it's quite good chicken stock on its own.

3. In the meantime, mix the marinade ingredients together in a large boil. Place the boiled chicken feet in the bowl and marinade well for a few hours.

4. Finally, steam the chicken feet, marinade and all. Eat with rice or place it on a cart (shopping trolley also can) and push around the house.

No sweat! Chicken feet! Ha! Ha! All the way!

Tags:

AddThis Social Bookmark Button

Saturday, October 08, 2005

Me raisin bun


This is not really a recipe...more like a story...due to "monetary circumstances"...i have been forced to create my own recipes from whatever ingredients i can find at home to stay alive...so i found a banana bread recipe and modified it to make *drum roll*...raisin bun...yalar yalar...i know the title say already...

what the recipe said:
2 cups flour
1 teaspoon baking powder
3/4 cup brown sugar
1/4 teaspoon salt
1/2 cup butter
2 eggs beaten
2 1/3 cups mashed over ripe bananas

I think this recipe will make delicious banana bread...but at home,i got no bananas and only one egg and lots of raisins...so this is what i came up with:

Soak raisins (i used 1 cup) overnight in rum...hehe...after helping yourself to some of course...i know what you're thinking...no...i'm not an alcoholic...

Preheat oven at 175 degrees celcius...i had mine at 140 because my oven always lies about the temperature...

Mix 2 cups of plain flour(my house got plenty of flour...plain flour,self raising flour,corn flour also got...enough to last till next year...haha) with 1 teaspoon of baking powder in a huge mixing bowl . Add 3/4 cup of brown sugar and 1/2 cup butter...Mix with mixer...i know...very dry right ? so i added whatever milk i had left in my fridge...it was only about 1/8 th of a cup...then mix again...then still a bit dry...nehmind...add egg (my house only got one egg left...cannot even put two...sigh) ...add the raisins that have been soaked overnight...and since it was so dry...i added...hehehe...some of the rum the raisins were soaked in (again i stress...no...i'm not an alcoholic) ...about 45 ml...or about 1/6 th of a cup...and also an approximately same amount of whipped cream...don't ask me why...it just felt right...maybe its the rum i had earlier doing its work(again...no...i am not an alcoholic...)...but anyway,then mix again until it's gooey sticky...knead into whatever shape you want and put in a suitable baking tray...pop in oven for about 50 minutes...the best way to judge is when a toothpick/knife comes out smoothly without any gooey sticky feeling inside after you poke the pasrty with it...and then...enjoy the suspiciously alcoholic raisin bun that's supposed to be bread and has the texture of a large cookie...wahaha...cheers...and no...i'm not an alcoholic...

Tags:

AddThis Social Bookmark Button